Key Takeaways
- CI/CD builds, tests, signs and uploads your Android app automatically.
- GitHub Actions, Gradle and Google Play Console form the complete release pipeline.
- Signing keys and service-account credentials stay in secrets, never in Git.
- Human approval gates production, followed by a staged 10% rollout.
- Reusing one signed AAB keeps tested and released builds identical.
Introduction
Imagine completing a new Android feature, pushing your code to GitHub, and a few minutes later receiving a notification that your application has been built, tested, signed and uploaded to Google Play. No manually generating AAB files, copying files between machines or forgetting to update the version code.
This is what CI/CD (Continuous Integration and Continuous Delivery/Deployment) helps Android developers achieve. In this guide, we will build an automated Android release pipeline using GitHub Actions, Gradle and Google Play Console.
- Automatically build your Android application.
- Run unit tests and lint checks.
- Generate a signed Android App Bundle (.aab).
- Upload the build to Google Play Internal Testing.
- Wait for human approval before production deployment.
- Gradually roll out the application to real users.
Understanding CI/CD Before We Start
Continuous Integration (CI)
Continuous Integration means automatically checking your code whenever developers push changes or create Pull Requests. A typical CI run checks out the repository, builds the app, runs tests and reports whether the change is safe to merge.
Continuous Delivery (CD)
Continuous Delivery prepares a release-ready application and makes it available for deployment. With the right configuration, the pipeline can upload the app to Google Play automatically.
Continuous Deployment
Continuous Deployment goes one step further: successful changes can be deployed automatically without a manual release approval. This tutorial uses automated uploads with a human approval gate before production deployment.
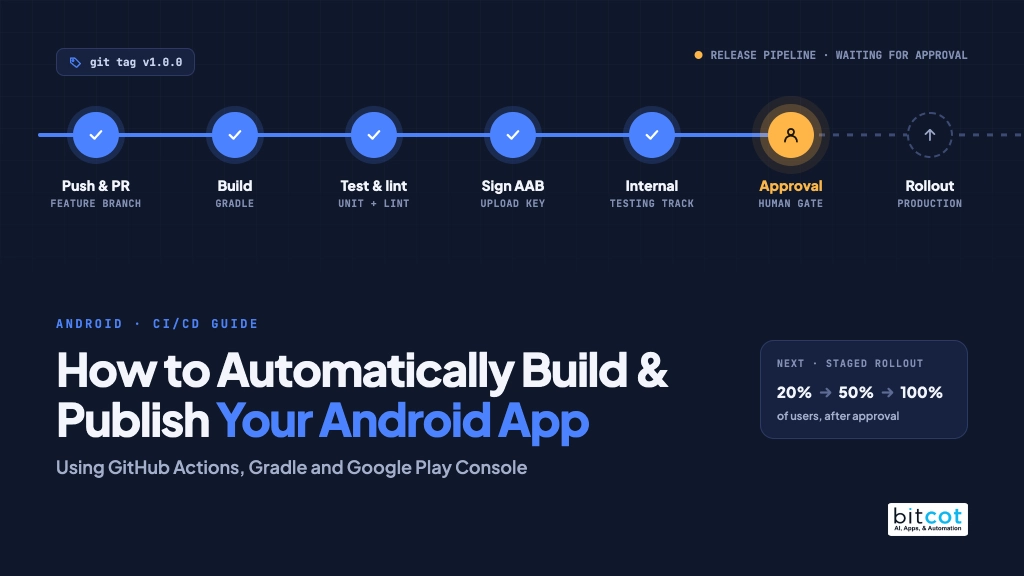
How the complete pipeline works
Developer writes code
        |
        v
Creates feature branch
        |
        v
Opens Pull Request
        |
        v
GitHub Actions runs CI (build, tests, lint)
        |
        v
PR approved and merged
        |
        v
Create release tag (v1.0.0)
        |
        v
Build signed AAB
        |
        v
Upload to Google Play Internal Testing
        |
        v
Human approval
        |
        v
Production rollout
We will use GitHub Actions. The same concepts can also be implemented using GitLab CI or Bitbucket Pipelines.
Prerequisites: What You Need Before Starting
| Requirement | Purpose |
|---|---|
| Android Studio | Android development |
| GitHub repository | Source code management |
| Google Play Developer account | App publishing |
| JDK | Gradle builds |
| Gradle wrapper | Automated project builds |
| Upload keystore | Application signing |
| Google Cloud project | Play API access |
Google Play testing requirement
Personal developer accounts created after November 13, 2023 must complete a closed test with at least 12 testers continuously opted in for 14 days before applying for production access. Check the requirements shown in your Play Console account.
Google testing requirements: https://support.google.com/googleplay/android-developer/answer/14151465
Android target SDK requirement
As of November 2026, new apps and app updates generally need to target Android 16 (API level 36) or higher for standard Android applications. Some device categories have different requirements.
Google Play target API requirements: https://support.google.com/googleplay/android-developer/answer/11926878
Verify your local release build
Run this command from your Android project directory:
./gradlew bundleReleaseIf the release build fails locally, fix those issues before moving to GitHub Actions.
Organize Your GitHub Repository
Recommended branching strategy
| Branch | Purpose |
|---|---|
| main | Stable, production-ready code |
| feature/* | New feature development |
| bugfix/* | Bug fixes |
| hotfix/* | Urgent production fixes |
Developers should create a feature or bug-fix branch, push their changes, open a Pull Request, wait for automated checks and approval, and then merge into main.
Protect your main branch
- Require Pull Requests before merging.
- Require at least one approval.
- Require CI status checks to pass.
- Block force pushes.
- Restrict direct pushes where appropriate.
Configure .gitignore
# Android build files
/build/
/app/build/
.gradle/
local.properties
# Signing credentials
*.jks
*.keystore
keystore.properties
# Google Play credentials
play-service-account*.json
Firebase google-services.json is not the same as a private service-account key. Whether to exclude it depends on your security and repository policy. Never expose private service-account credentials or signing passwords. If a secret is committed, treat it as compromised and rotate or replace it; deleting the file alone is not sufficient.
Understand Android App Signing
Google Play requires applications to be digitally signed before distribution. When using Play App Signing, the developer signs the uploaded bundle with an upload key, and Google Play uses the app signing key to sign APKs delivered to users.
| Key | Managed by | Purpose |
|---|---|---|
| Upload key | Developer | Signs the AAB before uploading |
| App signing key | Google Play | Signs APKs delivered to users |
Google Play App Signing documentation: https://support.google.com/googleplay/android-developer/answer/9842756
Generate an upload keystore
keytool -genkeypair -v \
  -keystore upload-keystore.jks \
  -alias upload \
  -keyalg RSA -keysize 2048 -validity 10000
You will be asked for the keystore password, key alias, key password and certificate information. Keep these details safe and back up the keystore in at least two secure locations.
Configure signing in Gradle
Open app/build.gradle.kts and configure signing through environment variables instead of hardcoding passwords:
val keystorePath =
    providers.environmentVariable("KEYSTORE_PATH").orNull
android {
    compileSdk = 36
    defaultConfig {
        applicationId = "com.yourcompany.yourapp"
        minSdk = 24
        targetSdk = 36
        versionCode = providers
            .environmentVariable("VERSION_CODE")
            .orElse("1").get().toInt()
        versionName = providers
            .environmentVariable("VERSION_NAME")
            .orElse("1.0.0-local").get()
    }
    signingConfigs {
        create("release") {
            if (keystorePath != null) {
                storeFile = file(keystorePath)
                storePassword = providers
                    .environmentVariable("KEYSTORE_PASSWORD").get()
                keyAlias = providers
                    .environmentVariable("KEY_ALIAS").get()
                keyPassword = providers
                    .environmentVariable("KEY_PASSWORD").get()
            }
        }
    }
    buildTypes {
        release {
            isMinifyEnabled = true
            isShrinkResources = true
            proguardFiles(
                getDefaultProguardFile("proguard-android-optimize.txt"),
                "proguard-rules.pro"
            )
            if (keystorePath != null) {
                signingConfig = signingConfigs.getByName("release")
            }
        }
    }
}
Understand versionCode and versionName
versionCode is an integer used internally by Google Play. versionName is the human-readable version shown to users. Every new upload must use a versionCode greater than the previously uploaded versionCode.
versionCode = 10
versionName = "1.2.0"
Configure Your Application in Google Play Console
Create your application
Open Google Play Console, select Create app, and enter the app name, default language, application type, free or paid status and required developer declarations.
5.2 Complete the store requirements
| Section | What you need |
|---|---|
| App access | Test login credentials if required |
| Ads | Declare whether the app contains ads |
| Content rating | Complete the questionnaire |
| Target audience | Select the intended age group |
| Data safety | Declare data collection and sharing |
| Privacy policy | Provide a valid privacy policy URL |
| Store listing | Description, icon, screenshots and graphics |
Upload your first application manually
The application package must already exist in Play Console before using the upload action. Build the signed bundle locally, then create an initial release under Testing > Internal testing.
./gradlew bundleReleaseThe generated bundle is normally located at:
app/build/outputs/bundle/release/app-release.aab- Open Google Play Console.
- Navigate to Testing > Internal testing.
- Create a new release.
- Upload the AAB file.
- Complete the initial release setup.
Upload Google Play GitHub Action documentation: https://github.com/r0adkll/upload-google-play
Connect Google Play Console with GitHub Actions
A Google Cloud service account provides GitHub Actions with a dedicated identity for authorized publishing operations.
Create a Google Cloud project
- Open Google Cloud Console: https://console.cloud.google.com/.
- Create a new project or select an existing project.
- Navigate to APIs & Services and open the API Library.
- Search for Google Play Android Developer API.
- Enable the API.
Create a service account
- Navigate to IAM & Admin > Service Accounts.
- Select Create Service Account.
- Use a name such as play-publisher-ci.
- Create the service account.
- Open its Keys section and select Add Key > Create New Key.
- Choose JSON and download the file.
Keep the JSON file private because it contains credentials.
Invite the service account in Play Console
Open Play Console > Users and Permissions and invite the service account email address. Grant only the permissions required to manage releases for the intended application and tracks.

Configure GitHub Repository Secrets
Navigate to GitHub > Repository Settings > Secrets and variables > Actions and create the following repository secrets:
| Secret name | Value |
|---|---|
| KEYSTORE_BASE64 | Base64-encoded upload keystore |
| KEYSTORE_PASSWORD | Keystore password |
| KEY_ALIAS | Upload key alias |
| KEY_PASSWORD | Key password |
| PLAY_SERVICE_ACCOUNT_JSON | Entire service-account JSON content |
| GOOGLE_SERVICES_JSON_BASE64 | Optional Firebase configuration |
Convert your keystore into Base64
On macOS:
base64 -i upload-keystore.jks \
  -o keystore.b64
On Linux:
base64 -w 0 upload-keystore.jks \
  > keystore.b64
Copy the generated Base64 content into the KEYSTORE_BASE64 GitHub secret.
Configure production approval
Navigate to Repository Settings > Environments, create an environment named production, and enable Required reviewers. Select the appropriate team members. Where supported, enable prevention of self-review.
Create Your First GitHub Actions Workflow
Create two workflow files: ci.yml for automated checks and release.yml for building, signing and publishing tagged releases.
your-android-project/
├── app/
│   └── build.gradle.kts
├── gradle/
├── gradlew
├── build.gradle.kts
├── settings.gradle.kts
└── .github/
    └── workflows/
        ├── ci.yml
        └── release.yml
Workflow 1: Automated CI checks
Create .github/workflows/ci.yml:
name: Android CI
on:
  pull_request:
    branches: [main]
  push:
    branches: [main]
permissions:
  contents: read
concurrency:
  group: ci-${{ github.ref }}
  cancel-in-progress: true
jobs:
  build-test:
    runs-on: ubuntu-latest
    timeout-minutes: 30
    steps:
      - name: Checkout Repository
        uses: actions/checkout@v4
      - name: Setup JDK
        uses: actions/setup-java@v4
        with:
          distribution: temurin
          java-version: 17
      - name: Setup Gradle
        uses: gradle/actions/setup-gradle@v4
      - name: Run Lint
        run: ./gradlew lintDebug
      - name: Run Unit Tests
        run: ./gradlew testDebugUnitTest
      - name: Build Debug APK
        run: ./gradlew assembleDebug
      - name: Upload Test Reports
        if: always()
        uses: actions/upload-artifact@v4
        with:
          name: android-ci-reports
          path: |
            **/build/reports/**
            **/build/test-results/**
          if-no-files-found: ignore
The workflow checks out the repository, installs Java, prepares Gradle, runs lint and unit tests, builds a debug APK and saves available reports. Use a JDK version compatible with your Gradle and Android Gradle Plugin versions.
Workflow 2: Automated Play Store release
Create .github/workflows/release.yml:
name: Android Release
on:
  push:
    tags:
      - 'v*.*.*'
permissions:
  contents: read
jobs:
  release-internal:
    runs-on: ubuntu-latest
    timeout-minutes: 45
    steps:
      - name: Checkout Repository
        uses: actions/checkout@v4
      - name: Setup JDK
        uses: actions/setup-java@v4
        with:
          distribution: temurin
          java-version: 17
      - name: Setup Gradle
        uses: gradle/actions/setup-gradle@v4
      - name: Restore Keystore
        env:
          KEYSTORE_BASE64: ${{ secrets.KEYSTORE_BASE64 }}
        run: |
          printf '%s' "$KEYSTORE_BASE64" |
            base64 --decode > "$RUNNER_TEMP/upload-keystore.jks"
      - name: Restore Firebase Configuration
        if: ${{ secrets.GOOGLE_SERVICES_JSON_BASE64 != '' }}
        env:
          FIREBASE_CONFIG: ${{ secrets.GOOGLE_SERVICES_JSON_BASE64 }}
        run: |
          printf '%s' "$FIREBASE_CONFIG" |
            base64 --decode > app/google-services.json
      - name: Set Application Version
        run: |
          VERSION_NAME="${GITHUB_REF_NAME#v}"
          VERSION_CODE=$((100000 + GITHUB_RUN_NUMBER))
          echo "VERSION_NAME=$VERSION_NAME" >> "$GITHUB_ENV"
          echo "VERSION_CODE=$VERSION_CODE" >> "$GITHUB_ENV"
      - name: Run Release Unit Tests
        run: ./gradlew testReleaseUnitTest
      - name: Build Signed AAB
        env:
          KEYSTORE_PATH: ${{ runner.temp }}/upload-keystore.jks
          KEYSTORE_PASSWORD: ${{ secrets.KEYSTORE_PASSWORD }}
          KEY_ALIAS: ${{ secrets.KEY_ALIAS }}
          KEY_PASSWORD: ${{ secrets.KEY_PASSWORD }}
        run: ./gradlew bundleRelease
      - name: Upload to Google Play Internal Testing
        uses: r0adkll/[email protected]
        with:
          serviceAccountJsonPlainText: ${{ secrets.PLAY_SERVICE_ACCOUNT_JSON }}
          packageName: com.yourcompany.yourapp
          releaseFiles: app/build/outputs/bundle/release/app-release.aab
          tracks: internal
          status: completed
          mappingFile: app/build/outputs/mapping/release/mapping.txt
      - name: Save Release Artifacts
        uses: actions/upload-artifact@v4
        with:
          name: release-${{ github.ref_name }}
          path: |
            app/build/outputs/bundle/release/*.aab
            app/build/outputs/mapping/release/mapping.txt
          if-no-files-found: error
      - name: Clean Up Sensitive Files
        if: always()
        run: |
          rm -f "$RUNNER_TEMP/upload-keystore.jks"
          rm -f app/google-services.json
  promote-production:
    needs: release-internal
    runs-on: ubuntu-latest
    environment: production
    steps:
      - name: Download Release Artifact
        uses: actions/download-artifact@v4
        with:
          name: release-${{ github.ref_name }}
          path: out
      - name: Publish to Production
        uses: r0adkll/[email protected]
        with:
          serviceAccountJsonPlainText: ${{ secrets.PLAY_SERVICE_ACCOUNT_JSON }}
          packageName: com.yourcompany.yourapp
          releaseFiles: out/bundle/release/app-release.aab
          tracks: production
          status: inProgress
          userFraction: 0.1
Important configuration notes
- Replace com.yourcompany.yourapp with your actual application ID.
- Adjust Java and Gradle versions to match your project.
- Make sure the version-code offset is higher than your last Play Store version code.
- Remove the Firebase restoration step if you do not use Firebase.
- For production security, pin third-party actions to verified full commit SHAs.
Understand the release workflow
- Build and upload: GitHub Actions creates the signed AAB and uploads it to Internal Testing.
- Wait for approval: the production job pauses because it references the production environment with required reviewers.
- Production rollout: after approval, GitHub downloads the previously generated AAB and uploads that same artifact to the production track.
The example uses status: inProgress and userFraction: 0.1 to request a 10% staged rollout. This is subject to Google Play release processing and review requirements. Reusing the same AAB avoids differences between the artifact tested internally and the artifact promoted to production.
Release Your Application Using Git Tags
For a normal release, developers can use:
git checkout main
git pull origin main
git tag v1.4.0
git push origin v1.4.0- Open GitHub and navigate to the Actions tab.
- Select the Android Release workflow.
- Monitor the build and test steps.
- Verify that the application appears in Internal Testing.
- Test the uploaded application.
- Approve the production deployment when ready.
- Monitor the production rollout in Google Play Console.
Once configured, you no longer need to generate the release bundle manually for every update.
Monitor and Maintain Your Releases
Firebase Crashlytics
Integrate Firebase Crashlytics to identify crashes and stability issues. If R8 or ProGuard is enabled, upload the generated mapping.txt file so obfuscated crash stack traces can be de-obfuscated.
Android Vitals
- Crash rate
- ANR rate
- Battery usage
- Performance issues
- Device compatibility
Google Play Pre-launch Reports
Review automated device testing results available in Play Console after uploading a release.
Dependency updates
Enable Dependabot or Renovate to monitor Gradle dependencies and GitHub Actions updates.
Native library compatibility
If your app includes native .so libraries, verify compatibility with Android’s 16 KB memory page-size requirements.
Secret protection
Enable GitHub secret scanning and push protection where available. Keep production signing credentials restricted to trusted release workflows. Never expose them to workflows triggered by untrusted fork Pull Requests.
Common CI/CD Errors and How to Fix Them
| Error | Possible reason | Solution |
|---|---|---|
| 403 Permission Denied | Service account lacks permissions | Check Play Console user permissions |
| Version code already used | Duplicate version code | Generate a higher version code |
| Package not found | App is not registered or initial upload is missing | Upload the initial AAB manually |
| Upload key mismatch | Wrong keystore or alias | Verify signing credentials |
| Gradle build failed | JDK or dependency incompatibility | Check Gradle logs and JDK version |
| Precondition check failed | Play Console release requirements are not met | Check track progression and pending requirements |
| Resource not found | Incorrect artifact path | Verify the AAB output location |
| Approval required | Production environment is waiting | Ask an authorized reviewer to approve |
If an upload succeeded but a later workflow step failed, do not blindly rerun the release with the same version code. Check the Play Console release state first. If that version was already accepted, prepare a new version with a higher version code.
Complete CI/CD Implementation Checklist
Google Play Console
- Developer account verified
- Application created in Play Console
- Required declarations completed
- Store listing and graphics uploaded
- Initial AAB uploaded manually
- Testing tracks configured
Application signing
- Upload keystore generated
- Keystore backed up securely
- Signing passwords stored safely
- Gradle signing configuration completed
- No signing credentials committed to Git
Google Cloud setup
- Google Play Android Developer API enabled
- Service account created
- JSON credentials generated
- Service account invited to Play Console
- Minimum required permissions assigned
GitHub configuration
- Repository created
- Main branch protected
- CI workflow configured
- Release workflow configured
- All required secrets added
- Production environment and reviewers configured
Testing and deployment
- Local release build successful
- Automated unit tests passing
- Lint checks passing
- Signed AAB generated successfully
- Internal Testing upload successful
- Production approval tested
- Staged rollout verified
- Crash monitoring configured

Final Thoughts: Is CI/CD Worth Implementing for Android Projects?
Absolutely. CI/CD is not just a solution for large development teams. Even individual Android developers can benefit from automating repetitive build, testing and publishing tasks. Once configured properly, your team can spend less time managing releases and more time developing features.
- Consistency: Every release follows the same process.
- Fewer human errors: Automated versioning and signing reduce manual mistakes.
- Faster delivery: Builds and uploads happen automatically.
- Better code quality: Tests and lint checks run before release.
- Improved security: Sensitive credentials stay outside your source code.
- Controlled publishing: Human approval protects production releases.
A practical approach is to start with a simple CI workflow that builds and tests your application. Once stable, introduce automated signing and Internal Testing uploads. Finally, configure production approval and staged rollout.
Write code. Push changes. Let automation handle the repetitive release process.
Useful Resources and Official Documentation
- GitHub Actions Documentation — https://docs.github.com/en/actions
- Android Command-Line Build Documentation — https://developer.android.com/build/building-cmdline
- Google Play App Signing — https://support.google.com/googleplay/android-developer/answer/9842756
- Google Play Developer API — https://developers.google.com/android-publisher
- Upload Google Play GitHub Action — https://github.com/r0adkll/upload-google-play
- GitHub Environments — https://docs.github.com/en/actions/how-tos/deploy/configure-and-manage-deployments/manage-environments
- Google Play Target API Requirements — https://developer.android.com/google/play/requirements/target-sdk
Suggested Blog Publishing Details
| Field | Suggested value |
|---|---|
| Category | Android Development / DevOps |
| Tags | Android, Kotlin, CI/CD, GitHub Actions, Gradle, Google Play Console, Automation, DevOps |
| Reading time | Approximately 15–20 minutes |
| URL slug | andro |
Frequently Asked Questions
What is CI/CD for Android apps?
CI/CD for Android apps automatically builds, tests, signs and uploads your application whenever you push code. Continuous Integration checks every change, while Continuous Delivery prepares a release-ready app that can be uploaded to Google Play. This guide uses automated uploads with a human approval gate before production deployment.
What is the difference between an upload key and an app signing key?
The upload key is managed by the developer and signs the AAB before uploading. The app signing key is managed by Google Play and signs the APKs delivered to users. With Play App Signing, the developer signs the uploaded bundle with the upload key and Google Play handles the rest.
How do you trigger an automated Android release?
Push a version tag such as v1.4.0 from the main branch. The Android Release workflow then builds and tests the app, creates a signed AAB and uploads it to Google Play Internal Testing. The production job waits for an authorized reviewer to approve before the staged rollout begins.
Can this pipeline work with GitLab CI or Bitbucket Pipelines?
Yes, the same concepts can also be implemented using GitLab CI or Bitbucket Pipelines. This guide uses GitHub Actions for its examples. The pipeline still follows the same flow of build, test, sign, upload and approve.
Is CI/CD worth implementing for individual Android developers?
Yes, CI/CD is not just a solution for large development teams. Even individual Android developers can benefit from automating repetitive build, testing and publishing tasks. Releases become consistent, human errors drop, and human approval still protects production.